wireguard fritzbox wg wg-quick
Source
-
install WireGuard and load the necessary kernel module
# apt install wireguard # modprobe wireguard -
generate a keypair
# cd /etc/wireguard # ( umask 0077 && wg genkey | tee privatekey | wg pubkey > publickey ) -
ensure IPv4 forwarding is enabled and enable it if necessary
# cat /proc/sys/net/ipv4/ip_forward 1-
if this shows
0instead, enable it by adding the following line to/etc/sysctl.confnet.ipv4.ip_forward = 1and reload the settings with
# sysctl -p
-
-
now create a file called
wg0.conf(wg0is the usual name for a WireGuard interface) in/etc/wireguardwith the following content[Interface] Address = 192.168.11.2/30 ListenPort = 51820 PostUp = iptables -A FORWARD -i %i -j ACCEPT; iptables -t nat -A POSTROUTING -o eth0 -j MASQUERADE PostDown = iptables -D FORWARD -i %i -j ACCEPT; iptables -t nat -D POSTROUTING -o eth0 -j MASQUERADE PrivateKey = W...= [Peer] PublicKey = 4...= AllowedIPs = 192.168.11.1/30, 192.168.0.1/24PrivateKeyneeds to be the contents of theprivatekeyfile created before- in the
[Peer]section we specify the one and only client (this example is for connecting a VPS where the WireGuard server runs to a FRITZ!Box at home for allowing access to a local home server as the VPS runs a reverse proxy)- the
PublicKeymust be the client’s public key which can be found on the VPN (WireGuard) page under Internet > Freigaben after clicking the Show WireGuard settings button
- the
AllowedIPsoption must contain the desired IP address of this client in the WireGuard network (in this case192.168.11.1/30; we use a/30network to allow only exactly two peers) and the IP address of the FRITZ!Box in the home network (192.168.0.1/24in this case) to allow access to all devices in the home network (i.e. the desired home server we want to connect to)
- the
-
then we can start the server (ignore the warnings) and check the status of the interface and the server using the following commands
# wg-quick up wg0 [#] ip link add wg0 type wireguard [#] wg setconf wg0 /dev/fd/63 Warning: AllowedIP has nonzero host part: 192.168.11.1/24 Warning: AllowedIP has nonzero host part: 192.168.0.1/24 [#] ip -4 address add 192.168.11.2/24 dev wg0 [#] ip link set mtu 1420 up dev wg0 [#] ip -4 route add 192.168.0.0/24 dev wg0 [#] iptables -A FORWARD -i wg0 -j ACCEPT; iptables -t nat -A POSTROUTING -o eth0 -j MASQUERADE # ip a s wg0 84: wg0: <POINTOPOINT,NOARP,UP,LOWER_UP> mtu 1420 qdisc noqueue state UNKNOWN group default qlen 1000 link/none inet 192.168.11.2/30 scope global wg0 valid_lft forever preferred_lft forever # wg interface: wg0 public key: H...= private key: (hidden) listening port: 51820 -
for the FRITZ!Box client we now need to write the config file that we can then import to create the connection to this server; it needs the following content
[Interface] Address = 192.168.0.1/24 PrivateKey = y...= [Peer] PublicKey = H...= AllowedIPs = 192.168.11.0/30 Endpoint = server.example.com:51820 PersistentKeepalive = 25- the
Addressshould normally be the same address as the first one in theAllowedIPsoption in the server config file but then the FRITZ!Box performs NATing and all clients on the home network would seem to respond from the address of the FRITZ!Box in the WireGuard network (i.e.,pings would reportDIFFERENT ADDRESS!whenpinging 192.168.0.2 as 192.168.11.1 would respond); therefore we have to use the address of the FRITZ!Box in the local home network instead (with the correct netmask) - it will nonetheless use the IP 192.168.11.1 in the WireGuard network, but it’ll only respond to 192.168.0.1 and all other clients from the home network will also respond with their correct IP addresses (see https://znil.net/index.php?title=FritzBox_-_Site_to_Site_VPN_zu_pfSense_mit_WireGuard_ohne_Tunnel_NAT#Konfigurationsdatei_f%C3%BCr_FRITZ!Box_erzeugen) - the
PrivateKeymust be the private key of the FRITZ!Box than can again be found in the WireGuard Settings - the
[Peer]section now contains the information of the WireGuard serverPublicKeyis the server’s public key can be found in thepublickeyfile from above or in the output of the wg commandAllowedIPsmust be the same subnet that the server usesEndpointis the DNS name or IP address and port of the serverPersistentKeepaliveis usually set to 25 (I guess a 25-second delay between consecutive heartbeats)
- the
-
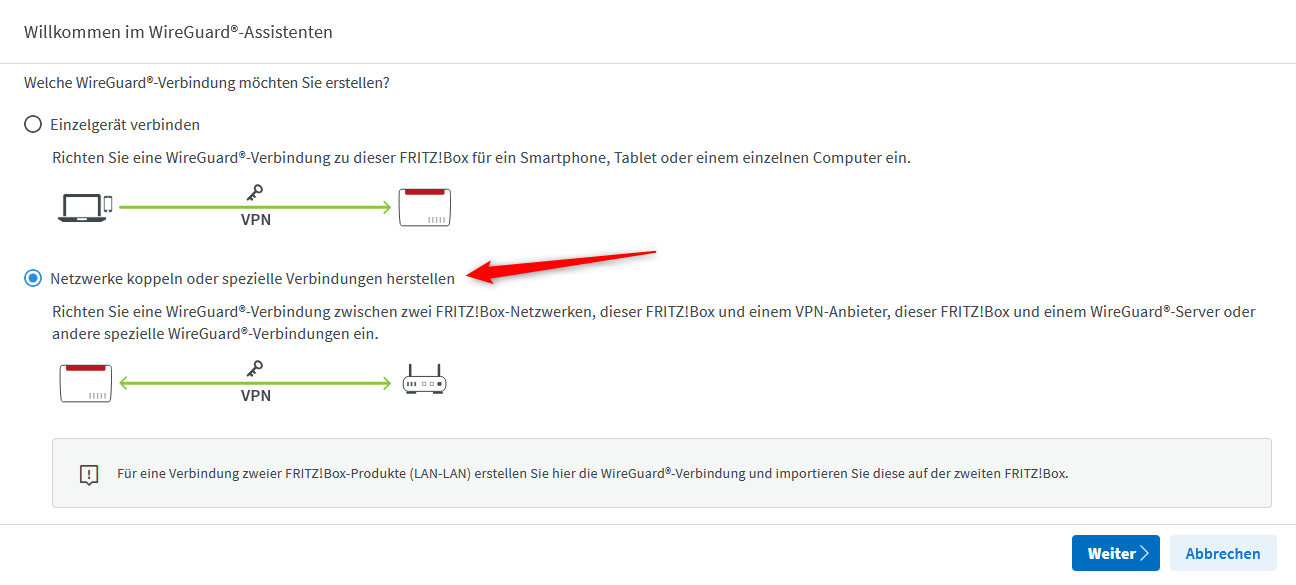
this file can now be imported using the WireGuard Assistant after selecting Couple Networks or Create a Custom Connection in the first step, then selecting Yes for Was this connection created on the remote peer?

- then select the file we created before, give the connection a name and click Finish
- after this you should see the connection under the WireGuard Network Connections in the overview
-
on the server we can check that the FRITZ!Box successfully connected using the
wgcommand again and trypinging some devices on the home network# wg interface: wg0 public key: H...= private key: (hidden) listening port: 51820 peer: 4...= endpoint: XXX.XXX.XXX.XXX:XXXX allowed ips: 192.168.11.0/24, 192.168.0.0/24 latest handshake: 33 seconds ago transfer: 3.48 KiB received, 2.07 KiB sent # ping 192.168.0.1 # the FRITZ!Box # ping 192.168.0.2 # another client